Loading...
What is ReactJs development

What is ReactJs Development?

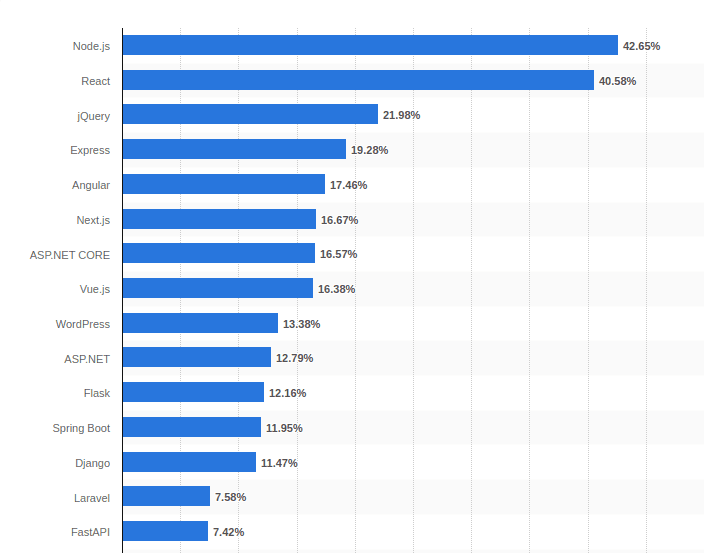
So, you want to know everything about ReactJs? You are on the right track. Grab your snacks, drinks, and, most importantly, your intelligent mind to focus on each topic we explain. In this blog, we discuss how to use ReactJS for website development, how to use ReactJS for mobile application development, and how ReactJS developers use this technology to develop highly interactive user interfaces. React js is Still very popular but slightly behind Node.js at 40.6%. Its component-based structure and large community make it a favourite for complex Single-Page Applications (SPAs).

So, let's start by discussing the first question that comes to your mind.

React — Framework or Library?

The React library is written in JavaScript. It’s used to build fast and responsive user interfaces for websites and mobile applications. It is an open-source, component-based front-end library that only manages the application's view layer.

React is called "the V in the MVC architecture", as it controls the application's look and feel. It is a client-side JavaScript library that runs in the user's browser. React also uses a virtual DOM, which improves performance by quickly updating only the necessary parts of the user interface.

In 2011, Facebook developed and maintained React. Suppose you are a developer with knowledge of website development core languages such as HTML, CSS and JavaScript. In that case, you can quickly create feature-rich user interfaces by understanding all the concepts covered in this blog.

Why is ReactJs Called a JavaScript Library?

React is called a JavaScript library primarily because it offers a set of reusable components and functions that developers can use to build user interfaces for websites and mobile applications using JavaScript. While it's true that React can be used to create, store, and use JavaScript applications, Its primary intention is to make it easier to build user interfaces.

Developers can use React to create UIs from individual, reusable components, which can be building blocks for web interfaces. React is an open-source JavaScript library that helps developers use JavaScript to build user interfaces and customise their applications with prewritten functions, add-ons, and scripts.

Why is ReactJs Popular in Web Development?

ReactJS is a simple JavaScript library for building user interfaces on websites and software. Because it is component-based, developers can design reusable user interface components. React's virtual DOM improves performance by quickly updating the real DOM, while its declarative approach makes UI development easier by defining how the UI should look. Write UI components in JavaScript files more easily with JSX syntax, and predictable application behaviour is guaranteed by React's one-way data flow. React offers a practical framework for creating dynamic and compelling online apps.

Reactjs is popular in developers' hearts for many reasons, including flexibility in development. First and foremost, its component-based architecture makes it simple to create reusable and modular UI elements. This component speeds up development and improves code maintainability for developers. React has a vibrant ecosystem that includes an extensive collection of libraries, tools, and community support, which helps to speed up development, so for this reason, developers always choose ReactJS first.

How to use hooks in React JS?

Hooks are used in React to give functional components access to the state and to manage side effects. Using hooks in ReactJS is simple. Without having to create a class, you can use state and other React features by using hooks. Let's take a basic overview of how to use hooks:

Import Hooks: Import the hooks you want to use from the react package. Commonly used hooks include useState, useEffect, useContext, useReducer, etc.

import React, { useState, useEffect } from 'react';

Using useState Hook: The useState hook allows you to add state to functional components. It returns an array with two elements: the current state value and a function to update it.

const [count, setCount] = useState(0);

Using useEffect Hook: The useEffect hook allows you to perform side effects in functional components. It takes a function as its argument, which will run after every render. You can also provide a second argument, an array of dependencies, to control when the effect runs.

useEffect(() => {
  document.title = `You clicked ${count} times`;
}, [count]); // Only re-run the effect if count changes

Create Custom Hooks: You can also create custom hooks to reuse stateful logic across components. Custom hooks are regular JavaScript functions prefixed with use.

function useCustomHook(initialValue) {
  const [value, setValue] = useState(initialValue);

  function handleChange(newValue) {
    setValue(newValue);
  }

  return [value, handleChange];
}

Using Context API with useContext Hook: The useContext hook allows you to consume values from a context without nesting.

const MyContext = React.createContext();

function MyComponent() {
  const value = useContext(MyContext);
  // use the value here
}

These are just a few examples of how you can use hooks in ReactJS to manage state, perform side effects, create custom logic, and consume context. Hooks provide a more concise and flexible way to work with React components than class-based ones.

How to use context API in React JS?

As mentioned before, the context API helps solve the problem of passing data through lots of nested components, which can make your code messy and complicated to manage. It's useful when sharing data across different app parts, divide your code easier to understand and maintain.

Using the Context API in React allows you to pass data by the component tree without passing props manually at every level. It's beneficial for passing down global data such as themes, user authentication, or language preferences.

Here's a basic example of how to use the Context API in React:

1. Create the Context: Use React.createContext().

// MyContext.js
import React from 'react';

const MyContext = React.createContext();

export default MyContext;

Provide the Context: Wrap your application (or a part of it) with a Context Provider. This is where you'll pass the data you want to make available to child components.

// App.js
import React from 'react';
import MyContext from './MyContext';

function App() {
  const someData = 'Hello from Context!';

  return (
    
      {/* Your components here */}
    
  );
}

export default App;

Consume the Context: In any block that needs access to the context data, use the useContext hook or the Consumer component.

Using useContext hook:

// MyComponent.js
import React, { useContext } from 'react';
import MyContext from './MyContext';

function MyComponent() {
  const contextData = useContext(MyContext);

  return 
{contextData}
; } export default MyComponent;
Using Consumer component:
// MyComponent.js
import React from 'react';
import MyContext from './MyContext';

function MyComponent() {
  return (
    
      {contextData => 
{contextData}
}
); } export default MyComponent;

Accessing Nested Contexts: You can nest contexts within each other. In this case, a component will access the nearest enclosing provider up the component tree.

Updating Context Data: To update context data, you would typically lift the state to the provider component or use more advanced techniques like reducers with the useReducer hook.

That's the basic idea of using the Context API in React. It helps to avoid prop drilling and makes your code cleaner by providing a way to share data across your component tree.

How to build forms in React JS?

We'll explore various scenarios that developers often face when working with forms, such as submitting forms, managing validation errors in fields, and dealing with loading indicators during form submission. Through examples, we'll walk through these everyday situations to provide a better understanding of how to build and manage forms in React effectively.

Building forms in React involves several steps, including defining form elements, handling user input, and managing form state. Here's a basic example of how to build a form in React:

Example of build form in React JS

import React, { useState } from 'react';

function MyForm() {
  const [formData, setFormData] = useState({
    firstName: '',
    lastName: '',
    email: '',
  });

  const handleChange = (e) => {
    const { name, value } = e.target;
    setFormData({ ...formData, [name]: value });
  };

  const handleSubmit = (e) => {
    e.preventDefault();
    // Handle form submission here
    console.log(formData);
  };

  return (
    <form onSubmit={handleSubmit}>
      <label>
        First Name:
        <input type="text" name="firstName" value={formData.firstName} onChange={handleChange} />
      </label>
      <label>
        Last Name:
        <input type="text" name="lastName" value={formData.lastName} onChange={handleChange} />
      </label>
      <label>
        Email:
        <input type="email" name="email" value={formData.email} onChange={handleChange} />
      </label>
      <button type="submit">Submit</button>
    </form>
  );
}

export default MyForm;

  • State Management: Use the useState hook to manage the state of your form data. Each form input should have its own state variable.
  • Handling Input Changes: Create a function to control changes to the form inputs. This function should update the state with the new input values.
  • Handling Form Submission: Create a function to handle form submission. This function should prevent the default form submission behaviour, perform any necessary validation, and submit the form data as needed.
  • Render the Form: Render the form elements inside the component's return statement. Use the value and onChange props to connect the form inputs to the state and input change handler.
  • Submit the Form: Add a submit button to the form. When clicked, this button should trigger the form submission handler.

This is a basic example of building a form in React. Depending on your application's requirements, you may need to add validation, error handling, or other features to your form.

How to handle events in React JS?

Handling events in React JS involves using event handlers hooks to respond to user interactions such as clicks, keypresses, form submissions, etc. Here's a basic overview of how to handle events in React:

Event Handling Syntax: In React, you use camelCase to specify event names rather than lowercase. For example, use onClick instead of on click.

Inline Event Handlers: You can add event handlers to JSX elements using inline event handler syntax.

import React from 'react';

function MyComponent() {
  const handleClick = () => {
    console.log('Button clicked');
  };

  return (
    
  );
}

export default MyComponent;

Using Arrow Functions: You can define event handler functions directly inside the JSX using arrow functions.

import React from 'react';

function MyComponent() {
  return (
    
  );
}

export default MyComponent;

Passing Parameters to Event Handlers: If you need to pass parameters to an event handler function, you can use an arrow function within the inline event handler.

import React from 'react';

function MyComponent() {
  const handleClick = (param) => {
    console.log('Button clicked with param:', param);
  };

  return (
    
  );
}

export default MyComponent;

Binding Event Handlers: You can also bind event handlers in the constructor or using arrow functions in class components to ensure they have access to the correct context.

import React, { Component } from 'react';

class MyComponent extends Component {
  constructor(props) {
    super(props);
    this.handleClick = this.handleClick.bind(this);
  }

  handleClick() {
    console.log('Button clicked');
  }

  render() {
    return (
      
    );
  }
}

export default MyComponent;

Preventing Default Behavior: You can prevent the default behaviour of an event using preventDefault().


import React from 'react';

function MyForm() {
  const handleSubmit = (e) => {
    e.preventDefault();
    console.log('Form submitted');
  };

  return (
    
); } export default MyForm;

These are the basic techniques for handling events in React. Depending on the complexity of your application, you may need to use more advanced event-handling patterns like event delegation, state lifting, or third-party event management libraries.

How to create a single page application (SPA) using ReactJS?

Creating single-page applications using ReactJS is a simple process. Follow these simple steps to create your SPA:

Set Up Your Development Environment: Ensure you have Node.js and npm (Node Package Manager) installed on your system. You can create a blank React project using create-react-app, a tool that creates a new React project with a default folder structure and build pipeline.

npx create-react-app my-spa

Design Your Application Structure: Plan out the components and layout of your SPA. Decide on the navigation structure and determine which components represent different pages or views within your application.

Create Components: Break down your application into reusable components. Each component should encapsulate a specific piece of functionality or UI element. Define your components' behaviour and structure using JSX syntax.

Implement Routing: Install the React Router library to handle client-side routing in your SPA. Define the routes for different pages or views in your application and map them to corresponding components.

npm install react-router-dom

// App.js
import { BrowserRouter as Router, Route, Switch } from 'react-router-dom';
import Home from './components/Home';
import About from './components/About';
import Contact from './components/Contact';

function App() {
  return (
    <Router>
      <Switch>
        <Route exact path="/" component={Home} />
        <Route path="/about" component={About} />
        <Route path="/contact" component={Contact} />
      </Switch>
    </Router>
  );
}

export default App;

Fetch Data: If your SPA needs to interact with a server to fetch data, you can use libraries like Axios or the built-in fetch API to make HTTP requests from your components.

Handle State: Manage application state using React's built-in state management or external libraries like Redux. Keep track of data that changes over time and pass it down to child components as props.

Styling: Use CSS, preprocessors like Sass, or CSS-in-JS libraries to style your components and create a visually appealing user interface.

Testing: Write individual tests for your components and integration tests for your application logic using testing frameworks like Jest and React Testing Library.

Build and Deploy: Once your SPA is ready, use the npm scripts provided by create-react-app to build a production-ready bundle of your application. The bundle can then be installed on a web server or hosted on a cloud platform such as AWS Amplify, Vercel, or Netlify.

npm run build

Optimization: Optimize your SPA for performance by reducing bundle size, lazy loading components, and implementing code splitting. Monitor your application's performance using tools like Lighthouse and improve as needed.

This is a high-level overview of creating a single-page application using ReactJS. As you dive deeper into development, you'll encounter additional challenges and considerations specific to your project requirements.

How Does the Elightwalk Developer Team Help You?

Elightwalk Technology has ten years of experience in the development field. We faced so many challenges and obstacles along the way and found innovative solutions to overcome them. Our reactJs developer team is committed to pushing the limits of technology and providing cutting-edge solutions in projects.

Consultation and Planning: Our team can work with you to understand your requirements, goals, and constraints. We can provide expert advice on technology choices, architecture design, and project planning to deliver a successful outcome.

Development and Implementation: Our team can handle your project's actual development and implementation. Whether building a new application from scratch, adding new features to an existing one, or fixing bugs, our team has the skills and experience to get the job done efficiently.

Quality Assurance and Testing: Testing software's working quality and working properly is more important. To find and resolve any issues before deployment, the Elightwalk team can conduct extensive testing, including unit testing, integration testing, and end-to-end testing.

Deployment and Maintenance: Our team can help you deploy your project to production environments and create a smooth transition once your project is ready. We can also provide ongoing maintenance and support to keep your application running smoothly and up-to-date.

Training and Knowledge Transfer: Our team can provide training and knowledge transfer sessions to your internal teams, enabling them to independently maintain and extend the application.

Continuous Improvement: The Elightwalk team believes in continuous improvement and can help you iterate on your project to incorporate feedback, address changing requirements, and stay ahead of the competition.

Our ReactJS developer team is committed to delivering high-quality, reliable software solutions that meet your needs and exceed your expectations.

Essence

By the end of this blog, you will have a clear vision of how ReactJS is used in development. You will also understand the benefits of utilising ReactJS for your projects and how it can help you achieve your business goals.

The Elightwalk team tries to be aware of using ReactJS in development for your project's valuable output. Also, ReactJS can provide a more helpful and user-friendly experience for developers and end users using new features and technology.

FAQs about reactJs

How does reactJs differ from other JavaScript libraries/frameworks?

Is reactJs suitable for all types of web applications?

Does reactJs have good community support and documentation?

Is reactJs suitable for beginners in web development?

Jayram Prajapati
Full Stack Developer

Jayram Prajapati brings expertise and innovation to every project he takes on. His collaborative communication style, coupled with a receptiveness to new ideas, consistently leads to successful project outcomes.

Most Visited Blog

Blog
The best practices for styling in React
Explore the art of styling in React with our comprehensive guide. From CSS frameworks to component-based styling, learn to create visually stunning interfaces.
Read More
Blog
How to use Dynamic Translation in React?

Unlock the power of dynamic translation in React with our detailed guide. Learn how to implement and leverage dynamic translation features to enhance the multilingual capabilities of React applications.

Read More
Blog
Difference between the Varnish and Redis cache in Magento performance?

In Magento Cache Management, both Redis and Varnish are used to improve your website's performance and scalability. Let's check together their areas of improvement in the Magento website performance.

Read More